
Contents
Raised beds are hugely popular with gardeners, as vegetables and herbs simply thrive on the added nutrients and higher temperatures offered by such a waist-high-box filled with plant substrate. It also makes it possible to grow food in unfavorable soil conditions, such as nutrient-poor, stony or contaminated soil. In addition, the plants can easily be cared for without stooping or kneeling and much easier to be kept free of undesirable weed.
Unfortunately, a raised bed kit from the garden center is relatively expensive. And constructing a stable raised bed by yourself may be too time-consuming for some. However, if you use outdated transport pallets, which are available through classified ads or on the Internet reasonably priced, you can easily build a durable raised bed yourself.
Which pallets and which tarpaulins are suitable for the construction of a raised bed?
It is important to use quite new pallets. Make sure that they have not been chemically treated. Look for pallets with the stamp “HT” (Heat Treated). This means that the wood has been treated with heat rather than chemicals. Chemically treated pallets are called “MB“. Remember to wear gloves when handling pallets. The wood is planed very roughly, so you can injure yourself quickly.
You need a floor space of 1.5 – 2 m² 16 – 22 ft²) for the raised bed. When choosing the film you should make sure that it is stable and can not tear easily.Old tarps made of PE will do it, as well as tear-resistant garden fleece. Foils for pond construction are not recommended, as they are usually contaminated with PVC. There are also commercially available nubbed foils that are also very suitable.

Construction manual for a pallet raised bed
You need:
- 4 pallets
- spirit level
- Hare wire (mesh size max 20 mm (0.8 inches))
- Film / linen bag tissue
- Screws 5 – 7 cm (2 -2.8 inches) – preferred Spax screws
- Staplers and tacker nails
- rechargeable driller
- 8 metal brackets (optional)
That’s how it works
- You need a flat surface, so the raised bed later stands straight and the water does not drain to one side. This can be checked with a spirit level and you may need level the soil underneath if necessary.
- Place two pallets at a 90-degree angle (with the transport surface inwards and the three footprints per pallet horizontal to the floor, so you have the possibility to plant something in the “boxes”), connect both with the Spax screws at the top and bottom. Make sure that the pallets are flush with each other. For an even better stability, you can also use metal brackets to connect the pallets.
- Align the next two pallets as well, place them flush and connect with each other.
- Now assemble the two pallet parts and connect them together. Now the basic structure is ready.
- Cut the hare wire so that it covers the entire floor and can be folded up slightly at the sides. When measuring, calculate 5-10 cm (2-4 inches) of addition. Lay out the floor and fix the wire to the edges of the pallets with a stapler. The grid protects against the ingress of voles.
- Measure the height and inner circumference of the raised bed to cut the foil. It is recommended a surcharge of at least 5 cm (2 inches) on each side, so you can fold over and overlap the film.
- Lay out the foil thoroughly at all sites and fasten with a stapler. Make sure to insert the film correctly in the lower corners, so that no tensions arise during later filling. Now the “framework” of the raised bed is ready.
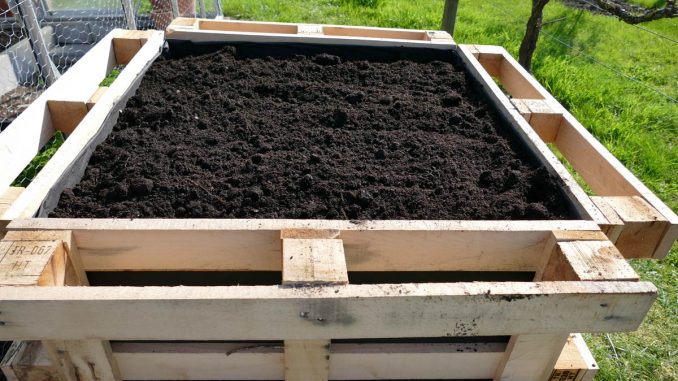
What is the raised bed filled with?
The filling is divided into five layers, from coarse to fine. The great thing is that you can simply use “garden waste”. The various organic materials ensure that a rotting process arises. This continuously releases high quality fertilizer for the plants. You build with the filling of the bed so to speak, the fertilizer with a. In addition, due to the rotting heat the raised bed can be planted earlier. The harvest time is also extended. After about 5 years, a raised bed should be refilled, because now not enough nutrients are available.

The five layers of the raised bed filling
(bottom to top)
- 1st layer (about 30 cm high (11 inches)): tree cuttings, shrubcuttings, hedge trimming. – These coarse materials provide good water drainage.
- 2nd layer (about 5 cm high (2 inches)): inverted turf (punched out turf), semi-mature compost.
- 3rd layer (20 cm high (8 inches)): leaves, plant remains, chopped straw
- 4th layer (10 cm high (4 inches)): coarse garden soil
- 5th layer (fill up to 5 cm below the edge (2 inches)): fine potting soil (depends on the favored plants)

Soil for herbs:
The soil for the 5th layer depends on the wanted plants/herbs, which should ultimately grow in the raised bed. Many mediterranean herbs such as lavender, sage or rosemary, for example, prefer rather sandy, dry and nutrient-poor soil with rapid drainage. Other herbs, such as dill, parsley or lovage prefer rather nutrient-rich soils, which are always slightly moist and have a higher humus content.
Which plants are suitable for the raised bed?
When planting you should make sure that it is different types (mixed culture), but “to get along well with each other”. You can chose the following vegetables for the first try: radishes, carrots, chard, kohlrabi and zucchini. The plantlets should be brought forward, for example, in the cold frame before they come out into the garden. Also pay attention to put enough space between the plants. Do not plant more than two zucchini in a raised bed. The leaves grow enormously and take the light from the other seedlings.
Herbs for the raised bed
Basically, most herbs can be cultivated in a raised bed. However, it should be considered that only herbs with the same site conditions are grown. In contrast to a herbal spiral, the individual stations are not vertical but horizontal. If you want to grow herbs with different site conditions, it is recommended, for example, in the middle of the raised bed rather moisture-loving herbs such as nasturtium, borage or parsley. In the outdoor area of the raised bed, you can then grow herbs that like it rather dry. These include many medicinal herbs such as agrimony, mugwort, savory or hyssop and most Mediterranean herbs. Between the humid and dry zones more tolerant herbs such as dill, chervil, marjoram, oregano or lemon balm can be grown.
The care of herbs in the raised bed is in most cases quite easy. Due to the decomposition processes in the lower layers bacteria provide fresh nutrients again and again, so that fertilization with correct raised bed construction is hardly necessary. Furthermore, it is possible to extend the growing season a bit, because the resulting heat in the raised bed is passed to the plant – especially the roots.
Add flower boxes to the pallets
By the structure of the pallets the sides of the raised bed can also be planted with a little effort. You can put herbs or flowers there. Just screw some old boards on the floor. The wood can be lined with foil. However, old plastic gutters, sawed to the right length, fit perfectly into the opening of the pallet feet. So you can build your own flower boxes.
Advantages of a raised bed at a glance
Earlier and longer harvest: Due to the higher location, a raised bed can be better heated by the sun and therefore has a higher soil temperature due to composting. This makes the vegetables ripen faster and the harvest is plentiful.
Protection against voles: Through the wire grid at the bottom of the raised bed, the rodents can not dig up.
Protection against snails: The demarcated bed is easier to protect from snails than the bed on the ground.
Use of garden waste: Leaves, grass clippings and straw bales can be wonderfully incorporated into the soil and act as a natural fertilizer.
More comfortable gardening: The work surface meets the gardener and require no stoop and bending the back.
Independence of the soil quality: Since the raised bed is planted in different layers, the soil can be adapted exactly to the needs of the vegetables or herbs. So you can look forward to a rich harvest in gardens even with poor soil.


Leave a Reply